Pro Talk – How to Fuse Cakes Together
Half the fun of fireworks season is getting to light fireworks, the other half is getting to watch them! However, if you’re planning a big backyard show with no empty sky, you’re not going to get to watch much of what you light. You’ll be too preoccupied with getting your next item ready as the last one fires. There’s a pretty awesome fix to this issue, fuse. With a little time and effort, you can fuse your entire backyard show together with one continuous fuse so you’ll be able to light once, step back, and enjoy the show!
How to Fuse Your Show
Last week we talked about the different types of fuses you can buy, and you’ll need that information to fuse your show together. If you haven’t yet, check out last week’s blog on fuses HERE.
Step 1: Put Together a Spreadsheet
You will need to know exactly how long each of your items last in order to cut the correct fuse length. The easiest way to find the duration of your items, is to pull them up on our website or YouTube channel. Watch how long the videos are, and make sure to shave off any time at the beginning and end of the video if the item has not started firing yet or has finished before the video ends. For example, click here to view Wild Ride on our site. Notice the item starts firing off the second the video starts, so you wont take any time off there. However, the video is :27 seconds long, but the last break fades out at :24 seconds. So :24 seconds is what you will enter in your spreadsheet for Wild Ride. Enter the amount of seconds into your spreadsheet to be able to use the formulas we provide going forward.
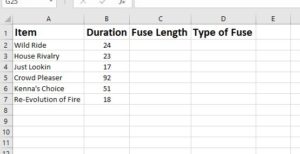
Your spreadsheet should look something like this.
Step 2: Cut Your Fuse
The reason we enter everything into a spreadsheet is so we know what fuse length we will need for each item. You’ll also need to pay close attention to how wide your items are to know which fuse to use. For the most part, we can use green cannon fuse for every item. But say you need enough fuse for :25 seconds, which equals one foot of green cannon fuse, and then your item is 18″ long. You won’t be able to use green fuse (at least not by itself) in this scenario because 18″ of green fuse would burn for :37.5 seconds which is too long for that item. A lot of times we can fix these issues by adding quick fuse to the end of the green fuse.
To get your green fuse length, use this formula: (seconds of item) / 2.083 = Inches of Fuse Example: Wild Ride is 24 seconds. 24/2.083=11.52″ You can enter this formula into your Excel sheet so it will do the math for you: =SUM(B2/2.083)
Remember to always test your fuse burn time, as it can vary from company to company. If you find your fuse does not burn 25 seconds per foot, use this formula to figure out how much time you have per inch. (Burn time for one foot) / 12 = Burn time by inch. Example: 25 seconds per foot fuse. 25/12=2.083 seconds per inch
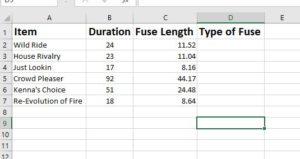
Now your spreadsheet should look something like this:
To cut the fuses, simply use a measuring tape and scissors. (It’s worth noting that I personally choose to round down on all my fuses because I don’t mind if my next item fires off while the last break of the previous item fires. I would much rather have a slight overlap than dead air time. So if an item says 11.52 inches of fuse, I’ll probably cut it closer to 11.25.) As you cut each fuse, it’s helpful to label them so you know which item it goes on. Also keep in mind you will not need to cut a fuse for your last item, as there will be nothing for it to light.
Step 3: Attaching Your Fuses
To attach your fuses to your cakes, zip ties work best. Simply line up the fuse you cut with the cake’s existing fuse and use two zip ties to attach it. Always use two zip ties to insure it doesn’t come apart. Run the fuse down the side of the cake and attach it to the next cake’s existing fuse and the fuse you cut for that cake. You should be zip-tying three fuses together at this point. The only time you’ll only have two fuses to attach is at the beginning and end of your show.
Note: I usually trim the zip ties down so there aren’t big pieces of them left laying in the yard. I didn’t trim them in these photos so you could see them easier.


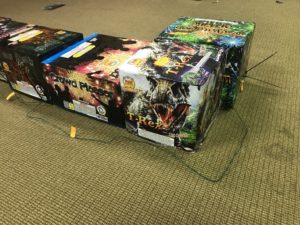
Since the fuse for Crowd Pleaser is so long, I turned the last two items to give the fuse more room to wrap around.
Step 4: Securing Your Cakes
Since your cakes will all be pretty back to back, the easiest way to secure them from tipping over is to duct tape them all together. For added safety, it’s always best to drive a couple of stakes into the ground along the sides as well. Just make sure you don’t tape over your fuses!
Step 5: Light and Enjoy!
Hands down the easiest and most exciting step. Light the fuse of your first item, sit back, and enjoy!